Generate Open Graph images in Node.js with local fonts and a logo
Generate branded Open Graph PNGs from React in Node.js using local fonts and a logo, with a reusable template, diagnostics and long-title checks.
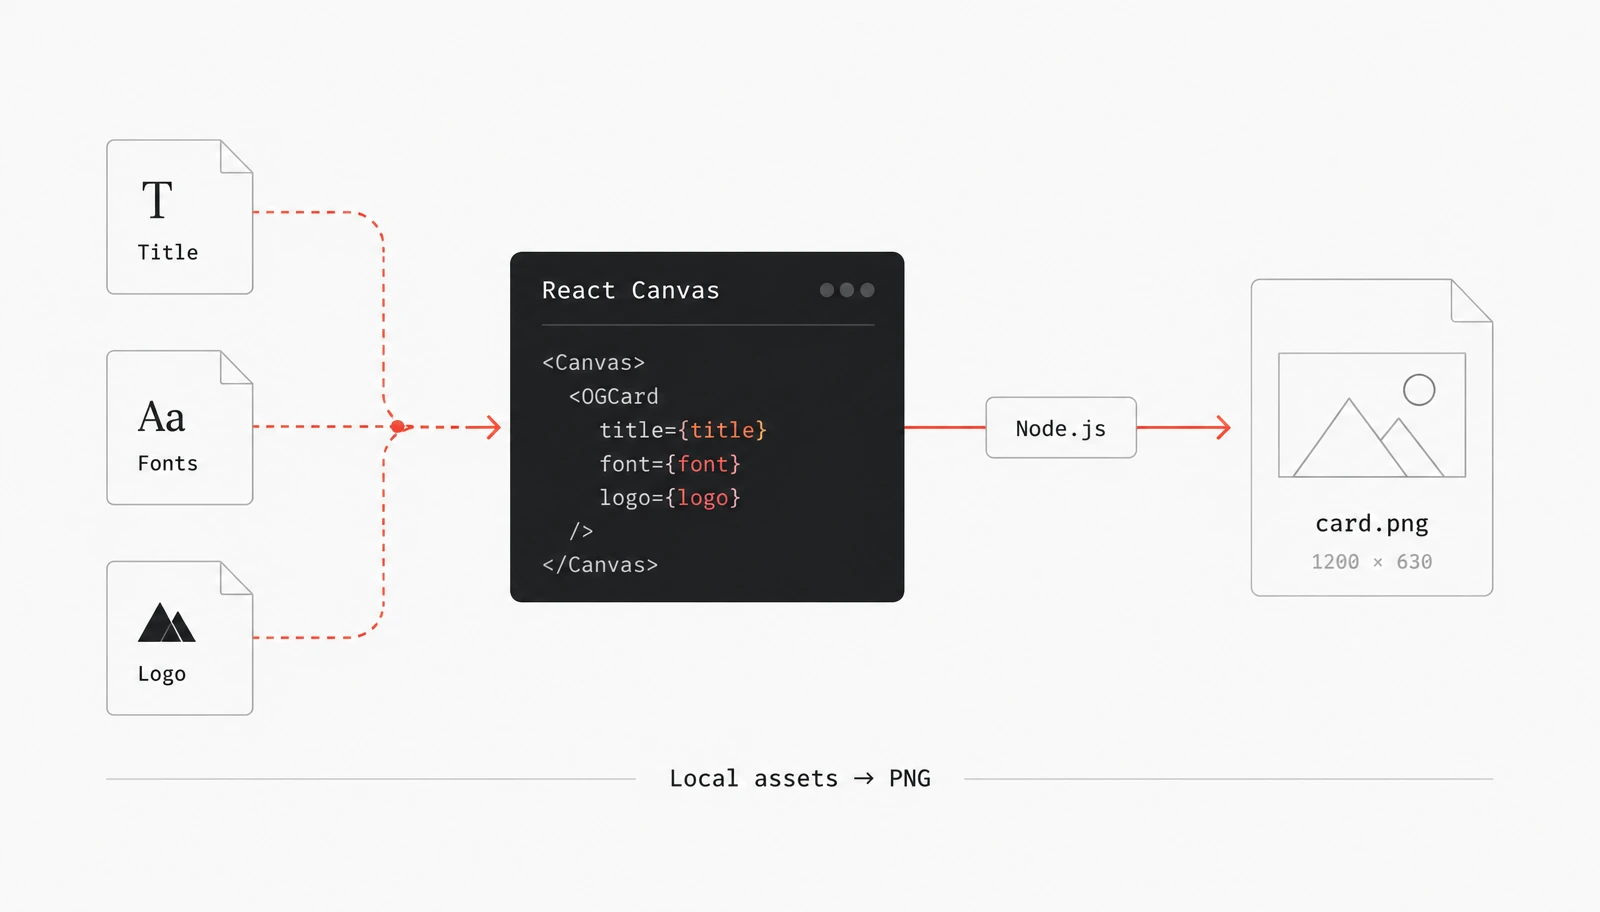
To generate an Open Graph image in Node.js, write a React template rooted in Canvas, read your font and logo files into memory, and pass them to Hyper Elements’ renderImage(). It returns PNG bytes you can write to disk. The renderer uses Satori and resvg without launching a browser or fetching your assets.
This tutorial builds one branded card from a post’s title and author. It stays in a standalone Node.js script: no API route, screenshot service or framework integration. You’ll also add a conservative diagnostics policy and a review checklist, because a fixed-size image can clip text even when a template passes its checks.
What do I need to generate a card?
Start with a maintained Node.js installation and an empty project directory. Install the React components, image engines and a runner for TypeScript with JSX:
npm init -y
npm install @hyper-elements/react satori@^0.33.5 @resvg/resvg-js react react-dom
npm install -D tsx
The Satori range is intentional: it is the compatibility range in the image renderer’s installation docs, not a pin to an old Hyper Elements release. Keep that engine requirement aligned with the current docs when upgrading. Image rendering is a separate entry point; the ordinary component import does not load these engines.
Add "type": "module" to package.json, preserving its other fields. Create tsconfig.json with the following content. In an existing project, merge this JSX setting rather than replacing its configuration.
{
  "compilerOptions": {
    "jsx": "react-jsx"
  },
  "include": ["card.tsx", "scripts/**/*.tsx"]
}
Place two font files and your logo in this structure. The logo in this example is a PNG whose intrinsic size is 240 by 80 pixels; change the template’s dimensions if yours differs. Use fonts and artwork you have permission to distribute.
fonts/
  Inter-Regular.ttf
  Inter-Bold.ttf
images/
  logo.png
scripts/
  render-card.tsx
card.tsx
tsx runs the script; it does not type-check it. Keep a separate TypeScript checking step if your project needs one.
How do I turn post data into a React image template?
Save this as card.tsx. A Canvas has explicit pixel dimensions. Its children stack vertically, and justifyContent: "space-between" spreads them through the available height. Text belongs in Heading and Text, not loose HTML elements.
card.tsx
import {
  Canvas,
  Heading,
  Image,
  Text,
} from "@hyper-elements/react";

export const logoKey = "https://example.com/brand/logo.png";

export type CardData = {
  title: string;
  author: string;
};

export function assertCardData(data: CardData) {
  if (!data.title.trim() || data.title.length > 90) {
    throw new Error("Use a non-empty card title of at most 90 code units.");
  }
  if (!data.author.trim() || data.author.length > 60) {
    throw new Error("Use a non-empty byline of at most 60 code units.");
  }
}

export function PostCard({ title, author }: CardData) {
  return (
    <Canvas
      width={1200}
      height={630}
      style={{
        backgroundColor: "#101827",
        color: "#ffffff",
        fontFamily: "Inter, sans-serif",
        padding: 64,
        gap: 24,
        justifyContent: "space-between",
      }}
    >
      <Image
        src={{ src: logoKey, width: 240, height: 80 }}
        alt="Northline"
        style={{ width: 120 }}
      />
      <Text
        style={{
          fontSize: 20,
          fontWeight: 700,
          letterSpacing: 2,
          color: "#b8c6da",
        }}
      >
        NORTHLINE NOTES
      </Text>
      <Heading
        level={1}
        style={{ fontSize: 64, fontWeight: 700, lineHeight: 1.1 }}
      >
        {title}
      </Heading>
      <Text style={{ fontSize: 28, color: "#b8c6da" }}>
        {author}
      </Text>
    </Canvas>
  );
}
The URL in logoKey is a lookup key, not a download instruction. The render script will associate that exact string with local image bytes. A plausible URL alone is not enough to render the logo.
The title and byline limits are application policy, not layout guarantees. JavaScript’s length counts UTF-16 code units, not visible characters or rendered width. A short unbroken identifier can be harder to fit than a longer sentence. Use a dedicated, concise card title when the full article headline does not fit.
How do I load local fonts and write the PNG?
Save this second file as scripts/render-card.tsx. Run it from the project root so the relative asset paths resolve to the files above. Assets load before rendering, and the template receives plain post data.
scripts/render-card.tsx
import { mkdir, readFile, writeFile } from "node:fs/promises";
import {
  ElementsError,
  formatDiagnostics,
  validate,
} from "@hyper-elements/react";
import { renderImage } from "@hyper-elements/react/image";
import { assertCardData, logoKey, PostCard } from "../card";

async function main() {
  const [regular, bold, logo] = await Promise.all([
    readFile("fonts/Inter-Regular.ttf"),
    readFile("fonts/Inter-Bold.ttf"),
    readFile("images/logo.png"),
  ]);

  const assets = {
    fonts: [
      { family: "Inter", src: regular, weight: 400 },
      { family: "Inter", src: bold, weight: 700 },
    ],
    images: { [logoKey]: logo },
  };

  const data = {
    title: "Ship a smaller JavaScript bundle",
    author: "Morgan Lee · Engineering",
  };
  assertCardData(data);
  const element = <PostCard {...data} />;

  const checked = validate(element);
  if (checked.diagnostics.length) {
    console.warn(formatDiagnostics(checked.diagnostics));
  }
  if (!checked.valid || checked.diagnostics.some((d) => d.severity === "warning")) {
    throw new Error("Resolve template errors and warnings before rendering.");
  }

  const { image, width, height, diagnostics } = await renderImage(element, assets);
  if (diagnostics.length) console.warn(formatDiagnostics(diagnostics));
  if (diagnostics.some((d) => d.severity === "warning")) {
    throw new Error("Resolve image warnings before saving the card.");
  }

  await mkdir("output", { recursive: true });
  await writeFile("output/card.png", image);
  console.log(`Wrote output/card.png (${width} × ${height})`);
}

main().catch((error: unknown) => {
  if (error instanceof ElementsError) {
    console.error(formatDiagnostics(error.diagnostics));
  } else {
    console.error(error);
  }
  process.exitCode = 1;
});
npx tsx scripts/render-card.tsxThe Node.js file API reads the assets as buffers, creates the output directory and writes the returned bytes. Open output/card.png to inspect the actual image. If a run fails, do not publish a leftover file from an earlier run; only consume the output after the script succeeds.
Why do font weights and image keys matter?
Hyper Elements’ image renderer fetches nothing. Each image must be supplied in the images map under the exact key its template uses, or embedded as a data URI. Supported image files are PNG, JPEG, GIF and SVG. Keep the asset paths fixed in your build configuration rather than letting external post data choose arbitrary local files.
Fonts are matched by family, weight and style. The template asks for Inter at regular and bold weights, so the script supplies both files under the same family name. Supplying only regular does not give the renderer the bold file: it uses the nearest supplied face and reports image/font-weight.
For image output, use TTF, OTF or WOFF bytes. WOFF2 is not drawn. A font declaration containing a web URL does not cause a download. The supplied fonts also need the actual glyphs you use; unsupported characters can appear as empty boxes. Check names, punctuation and the languages your posts contain, not just an English sample.
What should I check when the logo or font is missing?
Separate file-loading failures from rendering diagnostics. If Node reports that images/logo.png does not exist, check your working directory and the local filename first. The renderer has not received that image yet. If the file loads but rendering reports image/image, compare the template’s logoKey with the map key character for character, then confirm the bytes belong to a supported image format.
For example, changing the template to https://example.com/brand/mark.png while leaving the map under https://example.com/brand/logo.png creates two different identifiers. Loading the right file under the wrong identifier does not satisfy the template. Share one exported constant, as this example does, instead of maintaining duplicate strings.
For a font problem, compare the template’s fontFamily with the family names in assets.fonts. They are your matching labels, not filesystem paths. Renaming a WOFF2 file to .ttf does not convert it. Supply an actual supported file and explicitly include the weight the heading asks for. When you change assets, inspect the newly generated PNG rather than assuming an earlier preview still represents the card.
Does validation prove the card fits?
No. validate() can report unsupported template features and estimated Canvas overflow before rendering. It cannot check files it has not received. renderImage() adds font and image checks using the supplied bytes; errors reject with ElementsError.
| Finding | What to fix |
|---|---|
image/font |
Supply a usable font file; do not pass WOFF2. |
image/font-weight |
Supply the requested weight or change the template. |
image/image |
Check the exact lookup key, bytes and supported file format. |
canvas/overflow |
Shorten the content or change the layout, then inspect the PNG. |
The script refuses to save on warnings. That is a deliberately conservative policy for this example, not the renderer’s default behavior. A clean diagnostic list still does not certify that text fits: canvas/overflow is an estimate, and anything outside the fixed Canvas edges is cut off.
Before adopting the template, inspect a short title, your longest accepted title, an unbroken word, and representative accented or non-Latin text. Confirm the logo proportions, every line of the heading and the byline. If a title clips, rewrite it or reduce its font size and inspect again. Do not add unlimited user text: the renderer also lays out text beyond the visible boundary, consuming time and memory.
How do I generate one card for each post?
Once the first PNG looks right, reuse the loaded assets for a small list of post records. Replace the single-card block in main(), from const data through the final console.log, with this loop. It writes sequentially and keeps the same warning policy.
const posts = [
  {
    slug: "smaller-bundles",
    title: "Ship a smaller JavaScript bundle",
    author: "Morgan Lee · Engineering",
  },
  {
    slug: "useful-build-logs",
    title: "Make build logs useful",
    author: "Morgan Lee · Engineering",
  },
];

await mkdir("output", { recursive: true });
for (const post of posts) {
  if (!/^[a-z0-9]+(?:-[a-z0-9]+)*$/.test(post.slug)) {
    throw new Error("Use a plain lowercase slug for each output filename.");
  }
  assertCardData(post);
  const element = <PostCard {...post} />;
  const checked = validate(element);
  if (checked.diagnostics.length) {
    console.warn(formatDiagnostics(checked.diagnostics));
  }
  if (!checked.valid || checked.diagnostics.some((d) => d.severity === "warning")) {
    throw new Error(`Fix template diagnostics for ${post.slug}.`);
  }
  const result = await renderImage(element, assets);
  if (result.diagnostics.length) {
    console.warn(formatDiagnostics(result.diagnostics));
  }
  if (result.diagnostics.some((d) => d.severity === "warning")) {
    throw new Error(`Fix image warnings for ${post.slug}.`);
  }
  await writeFile(`output/${post.slug}.png`, result.image);
}
Use unique slugs, or later records overwrite earlier files. This small script is not a transactional publishing system: if a later record fails, earlier PNGs remain. Only publish the completed set after the whole command succeeds.
How does the card become a link preview?
Generating a PNG does not attach it to a page. Publish the chosen file at a public HTTPS URL, then add Open Graph metadata to that page’s HTML <head>. Replace these example URLs with your real page and image addresses:
<meta property="og:type" content="article">
<meta property="og:title" content="Ship a smaller JavaScript bundle">
<meta property="og:url" content="https://example.com/blog/smaller-bundles">
<meta property="og:image" content="https://example.com/og/smaller-bundles.png">
<meta property="og:image:type" content="image/png">
<meta property="og:image:width" content="1200">
<meta property="og:image:height" content="630">
<meta property="og:image:alt" content="Northline Notes: Ship a smaller JavaScript bundle, by Morgan Lee.">
The Open Graph protocol defines the page title, type, canonical URL and image URL, plus the image’s optional dimensions, type and description. The local filename is not a public image address. Check that the deployed page contains your tags and that the image URL opens without authentication before testing a shared link.
Frequently asked questions
Can I use a Google Fonts stylesheet instead of font bytes?
Not as the image renderer’s font input. Hyper Elements needs supported font file bytes or supported data URIs. Download and supply the required TTF, OTF or WOFF files with the correct family, weight and style.
Can I export SVG instead of PNG?
Yes. Pass format: "svg" to renderImage() and write the returned bytes to a .svg file. Text is drawn as paths. This tutorial uses PNG for the published card; changing the file extension alone does not change the output format.
Can I render this template in an Edge runtime?
The documented Hyper Elements image entry is Node.js-only. Keep this script in a Node.js build step rather than assuming the native image engine works in an Edge or browser runtime.
Will the title shrink automatically to fit?
This template does not implement automatic text fitting. Its title has a fixed font size and the Canvas clips at its edges. Keep a bounded, editorially chosen card title and inspect the actual PNG with your longest inputs.
Start with the single-card script: replace the sample data, logo and font files, then inspect your first PNG. The image output reference covers other formats and diagnostics. For other server-side outputs, try PDF invoices in Node.js; for an agent-led template repair loop, see React emails with Claude Code.