Build and validate React emails with Claude Code
Build a receipt email with Claude Code, fix template diagnostics, inspect its layout and render HTML and plain text for a test send.
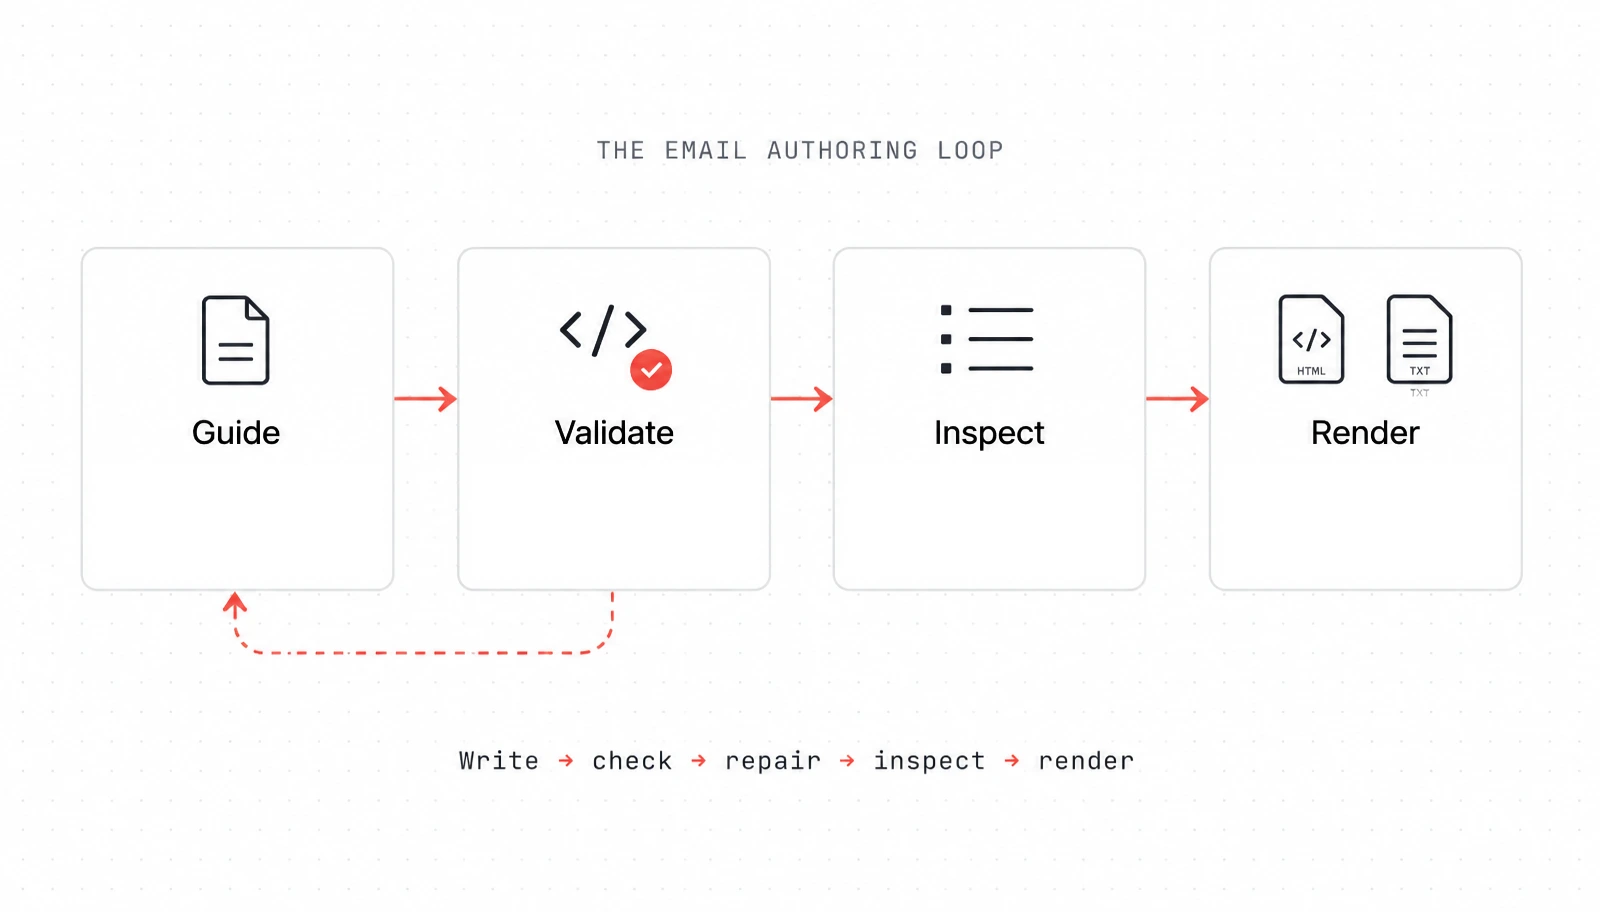
To build a React email with Claude Code, give it the guide shipped with your installed renderer, ask for a template, then make it check that template before sending. With Hyper Elements, that loop is validate() for template problems, outline() for text-based layout inspection, and render() for HTML and plain text. A passing check is useful feedback—not proof that every inbox looks right.
This tutorial takes a fictional shop’s receipt through that loop. You’ll keep order data separate from presentation, repair an unsupported style, and prepare a test send with Resend. Hyper Elements renders the message; your email provider delivers it. You don’t need to change providers to use this authoring workflow.
What does the complete receipt template look like?
Start with this template in emails/receipt.tsx. The example uses fictional data and a reserved example-domain link; replace the link and merchant details before a real send.
// emails/receipt.tsx
import {
  Button, Column, Email, Heading, Table, TableCell,
  TableRow, Text,
} from "@hyper-elements/react";

export type Order = {
  number: string;
  customer: string;
  items: { name: string; quantity: number; unitPrice: number }[];
  delivery: number;
  orderUrl: string;
};

const money = (cents: number) => `$${(cents / 100).toFixed(2)}`;

export function Receipt({ order }: { order: Order }) {
  const subtotal = order.items.reduce(
    (sum, item) => sum + item.quantity * item.unitPrice, 0,
  );

  return (
    <Email
      previewText={`Receipt for order ${order.number}`}
      style={{
        backgroundColor: "#f4f4f5",
        fontFamily: "Helvetica, Arial, sans-serif",
        gap: 16,
      }}
    >
      <Text style={{ fontWeight: 700 }}>Northline Supply</Text>
      <Column style={{ backgroundColor: "#ffffff", padding: 24, gap: 16 }}>
        <Heading level={1} style={{ fontSize: 24, mobile: { fontSize: 20 } }}>
          Thanks for your order, {order.customer}
        </Heading>
        <Text>We've received order {order.number}. Here's your receipt.</Text>
        <Table style={{ cellPadding: [8, 0], rowBorder: "1px solid #e4e4e7" }}>
          <TableRow header>
            <TableCell>Item</TableCell>
            <TableCell style={{ textAlign: "right" }}>Amount</TableCell>
          </TableRow>
          {order.items.map((item, index) => (
            <TableRow key={index}>
              <TableCell>{item.quantity} × {item.name}</TableCell>
              <TableCell style={{ textAlign: "right" }}>
                {money(item.quantity * item.unitPrice)}
              </TableCell>
            </TableRow>
          ))}
        </Table>
        <Text>Subtotal: {money(subtotal)}</Text>
        <Text>Delivery: {money(order.delivery)}</Text>
        <Text style={{ fontWeight: 700 }}>
          Total paid: {money(subtotal + order.delivery)}
        </Text>
        <Button href={order.orderUrl} style={{ backgroundColor: "#111827" }}>
          View your order
        </Button>
      </Column>
      <Text style={{ fontSize: 12, color: "#52525b" }}>
        Northline Supply · Fictional shop for this example
      </Text>
    </Email>
  );
}

export const exampleOrder: Order = {
  number: "NL-1042",
  customer: "Ada",
  items: [
    { name: "Field notebook", quantity: 2, unitPrice: 1200 },
    { name: "Pencil set", quantity: 1, unitPrice: 600 },
  ],
  delivery: 500,
  orderUrl: "https://example.com/orders/NL-1042",
};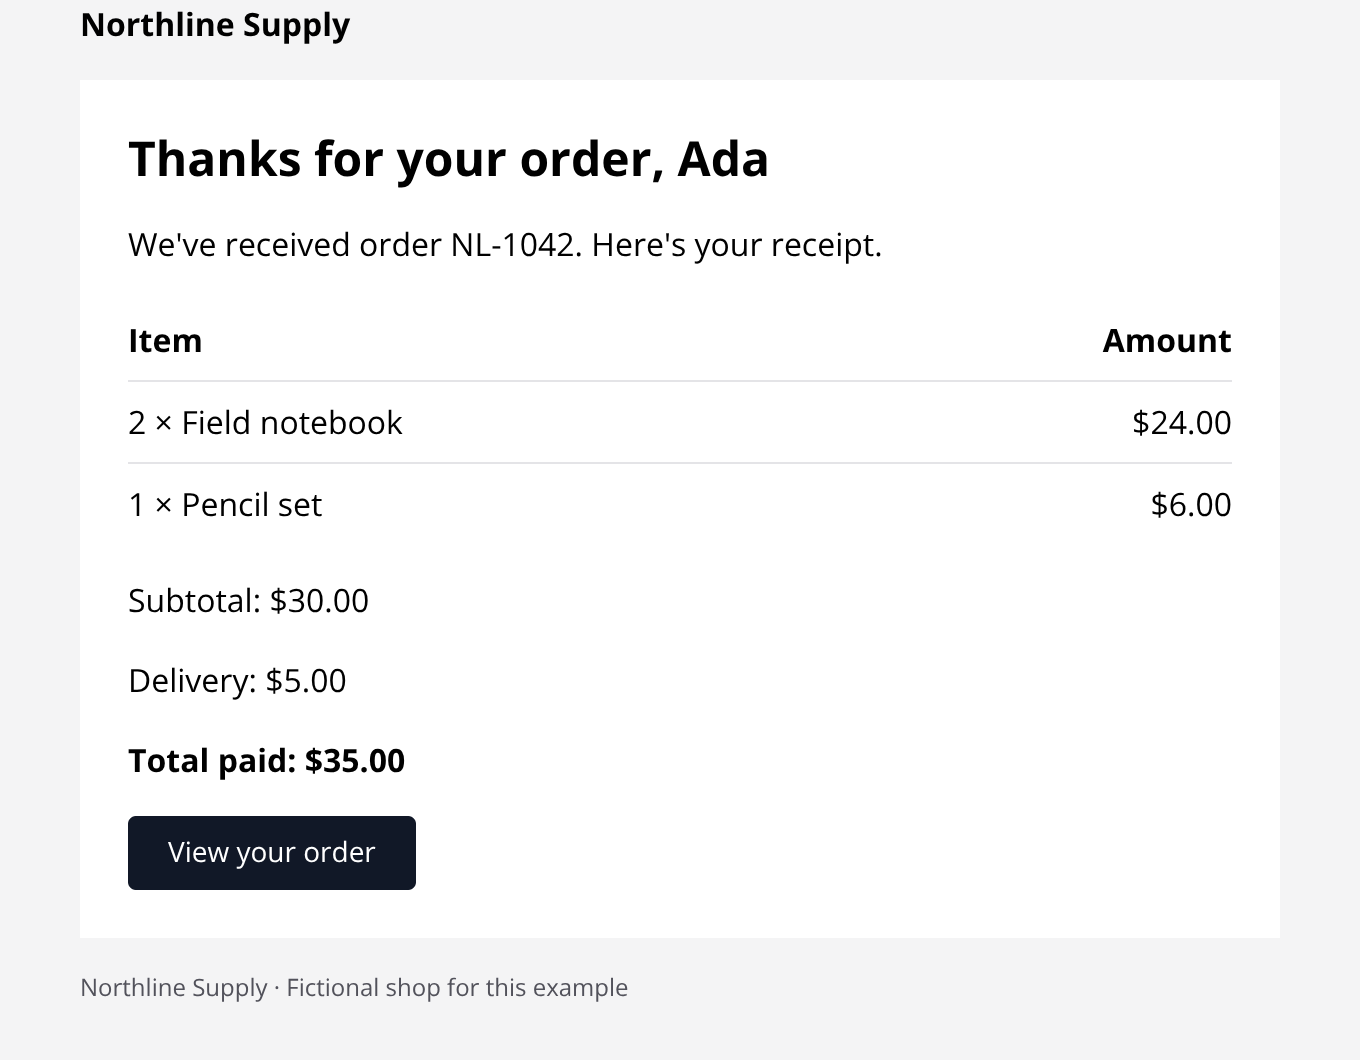
The prices are integer cents, with a deliberately simple USD formatter. Production totals should come from your trusted order system, including its tax, discount and currency rules. Don’t turn an email template into a second billing engine.
Two columns keep the item table compact. Quantity lives beside the item name instead of becoming a third narrow column. Spacing belongs to the containing Column‘s gap, and padding belongs inside that card. These are Hyper Elements’ layout rules, not arbitrary CSS conventions.
How do you set up the project and Claude Code?
Use a server-side Node.js project. In an existing app, keep its package manager and configuration. For a new folder, create a package.json first, then install the renderer and its React peers:
npm init -y
npm install @hyper-elements/react react react-dom
npm install -D tsx
The quickstart documents the renderer installation and requires React and React DOM 18 or later. This tutorial uses tsx’s project installation to execute the TypeScript/JSX scripts. It isn’t an email preview service or a type checker.
For the fresh project, add "type": "module" to package.json, keeping its other fields. Create a tsconfig.json containing:
{
  "compilerOptions": {
    "jsx": "react-jsx"
  },
  "include": ["emails/**/*.tsx", "scripts/**/*.tsx"]
}
In an existing TypeScript app, merge the JSX setting into its configuration rather than replacing it. The tsx TypeScript guide explains transformation settings and the separate role of type checking.
Put this import on its own line in a project-root CLAUDE.md:
@node_modules/@hyper-elements/react/GUIDE.mdUse the bare line, not a fenced code block inside the actual file. Claude Code’s memory documentation says imports resolve relative to the file containing them; imports inside code spans or fences are skipped. If your CLAUDE.md lives elsewhere, adjust the relative path.
The guide is generated from the component definitions and matches the package you installed. That’s more useful than asking an agent to reconstruct an API from remembered examples. After an upgrade, use the new package’s guide rather than an old copy pasted into your instructions.
What should you ask Claude Code to do?
Give the agent a brief with both the desired result and the checks it must show. For example:
Read the installed Hyper Elements GUIDE.md before changing the template.
Build a receipt email using emails/receipt.tsx and its Order type.
Keep order data outside the template. Use a two-column item table,
a clear total, a real customer name and one View your order button.
Use the components from @hyper-elements/react, not raw HTML tags.
Run validate(), report errors and warnings, and fix template errors.
Then show outline(), render HTML and plain text, and inspect both.
Don't send anything or use credentials until I ask.
This makes the acceptance criteria visible. A polished screenshot alone can’t tell you whether the plain text lost a total, whether the button points to the right order, or whether an unsupported property was used.
Load order data before rendering and pass it as props. Hyper Elements doesn’t wait for async or suspending template components. Keep database access and provider calls in your server-side workflow, outside Receipt.
How do you check and render the email?
Save the following as scripts/render-receipt.tsx. It is the complete local inspection step; it doesn’t send an email.
// scripts/render-receipt.tsx
import { mkdir, writeFile } from "node:fs/promises";
import { formatDiagnostics, outline, render, validate } from "@hyper-elements/react";
import { exampleOrder, Receipt } from "../emails/receipt";

async function main() {
  const email = <Receipt order={exampleOrder} />;
  const checked = validate(email);
  if (checked.diagnostics.length) {
    console.warn(formatDiagnostics(checked.diagnostics));
  }
  if (!checked.valid) throw new Error("Fix the template errors before rendering.");

  console.log(outline(email));
  const { html, text, diagnostics } = await render(email);
  if (diagnostics.length) console.warn(formatDiagnostics(diagnostics));

  await mkdir("preview", { recursive: true });
  await writeFile("preview/receipt.html", html);
  await writeFile("preview/receipt.txt", text);
}

main().catch((error) => {
  console.error(error);
  process.exitCode = 1;
});
Run it from the project directory:
npx tsx scripts/render-receipt.tsxOpen preview/receipt.html in a browser and read preview/receipt.txt separately. The HTML includes its head styles; don’t strip them before sending. The text version comes from the same template, but still deserves a human check for readable order, facts and destinations.
validate() reports template diagnostics without writing output. render() is asynchronous and rejects invalid templates with an ElementsError. Our outer error handler also catches unexpected failures in your code; don’t assume template validation makes application exceptions impossible.
How does the agent repair an unsupported style?
A common mistake is adding a margin to a text block. The diagnostics reference uses this intentionally invalid example:
import { Email, Text, validate } from "@hyper-elements/react";

const result = validate(
  <Email>
    <Text style={{ marginBottom: 16 }}>Hi</Text>
  </Email>
);
TypeScript flags marginBottom as an unsupported style before runtime. For JavaScript or generated input that reaches validation, the documented result is valid: false, code style/unknown, and path root.children[0].style.marginBottom. The message tells you to use the parent’s gap or padding.
Repair the layout relationship instead of substituting another margin:
<Column style={{ gap: 16 }}>
  <Text>We've received your order.</Text>
  <Text>We'll email you when it ships.</Text>
</Column>
Don’t paste the deliberately invalid snippet into the finished receipt. Use it to understand the feedback, then ask the agent to rerun the checks on the corrected template. Match diagnostic codes in automation and show the explanatory messages to people.
Also distinguish severity from success. An error makes the template invalid. A warning can leave valid true while reporting an output limitation; an info note can describe a difference such as classic Outlook’s square corners. Review the trade-off instead of blindly deleting all styling until the list is empty.
What should you look for in outline()?
outline() describes the laid-out template as text: blocks, desktop widths, words and links. It can also say whether a Row stacks on phones. It is not a screenshot, a mobile simulation or an inbox capture.
For this receipt, check the content rather than copying a supposedly universal outline transcript:
- The customer’s name and order number are present.
- The table has an item and an amount column, with every line item.
- Subtotal, delivery and total are present in a sensible reading order.
- The button’s destination matches the order you passed in.
Then inspect the browser preview at wide and narrow widths. Long product names, more items and larger prices are better stress cases than the shortest possible example. An outline can make structure inspectable, but it doesn’t certify visual quality.
How do you send a test with Resend?
Install Resend’s Node SDK, following its Node.js guide:
npm install resendSave this as scripts/send-receipt.tsx. Configure RESEND_API_KEY, EMAIL_FROM and EMAIL_TO in the server process before running it. Use a sender on your verified domain and your own test inbox. Never commit the key or put it in a browser bundle.
// scripts/send-receipt.tsx
import { Resend } from "resend";
import { render } from "@hyper-elements/react";
import { exampleOrder, Receipt } from "../emails/receipt";

async function main() {
  const { RESEND_API_KEY, EMAIL_FROM, EMAIL_TO } = process.env;
  if (!RESEND_API_KEY || !EMAIL_FROM || !EMAIL_TO) {
    throw new Error("Set RESEND_API_KEY, EMAIL_FROM and EMAIL_TO on the server.");
  }
  const resend = new Resend(RESEND_API_KEY);
  const { html, text } = await render(<Receipt order={exampleOrder} />);
  const { data, error } = await resend.emails.send({
    from: EMAIL_FROM,
    to: EMAIL_TO,
    subject: `Your receipt for order ${exampleOrder.number}`,
    html,
    text,
  });
  if (error) throw new Error(`Resend: ${error.message}`);
  console.info("Resend accepted:", data?.id);
}

main().catch((error) => {
  console.error(error);
  process.exitCode = 1;
});
After replacing the example merchant details and link and reviewing the files, run:
npx tsx scripts/send-receipt.tsxProvider acceptance isn’t proof of inbox delivery or correct rendering. Send tests to the clients your readers use and verify the HTML and plain-text parts. The sending guide also covers using other providers with the same rendered output.
What should you review before a real send?
Use a short, repeatable review instead of asking the agent whether the result is “good.” First compare the receipt with the source order: names, quantities, delivery charge and the destination URL. Then read the plain text without looking at the HTML. A customer should understand the same purchase and next action in either version.
Next try a longer customer name and a long product label. Look for awkward wrapping at a narrow browser width, but don’t describe that browser view as an Outlook or Gmail test. Finally, send to your own inboxes and open the message in the clients you support. Record any difference you accept deliberately, rather than making the agent chase a different design on every pass.
For a team workflow, keep these review criteria beside the template. The agent can repeat structural checks; the owner still decides whether the receipt says the right thing and is ready for customers.
What does validation not prove?
A valid template isn’t a universal email-client guarantee. Browser layout, a diagnostic derived from support information, and a real message opened in an inbox are different checks. Use all three where they matter.
Some checks need the written HTML: Gmail-related HTML and stylesheet size diagnostics arrive during render(), not the earlier validate() step. Don’t stop at the first green result. Check mobile readability, links, plain text and the clients that actually receive your messages.
FAQ
Can Claude Code send the email for me?
The template workflow doesn’t grant permission to send. Keep credentials on the server and require an explicit sending step. Start with your own test inbox, not a customer list.
Does valid: true mean there are no warnings?
No. It means no template errors were reported. Read warnings and notes, and inspect render-time diagnostics as well.
Do I need Resend?
No. This tutorial uses it for a concrete test send. Hyper Elements writes HTML and plain text; a provider such as SES, Postmark, SendGrid or Nodemailer can deliver those bodies too.
What’s the next step?
Adapt exampleOrder, replace the fictional merchant and example-domain link, and repeat the check–inspect–render loop. Keep the quickstart, agent guide and rendering reference alongside the template as you make it your own.